Monday, September 29, 2014

The Cornell Box

Hello Students,
For this project you will be getting more familiar with the workflow and methods in using Autdodesk's Maya to create a 3D scene with objects, lighting, a camera and textures. You will then render this scene and adjust quality, then render an animation to learn the basics of keyframing and render settings as well.

Cornell Box Project: Lights, Camera, Action!

History of the Cornell Box: The Cornell Program of Computer Graphics has become best known for its research on physically based rendering. They believe that computer graphic simulations will never become predictive of reality unless we correctly model the physics of light reflection and energy propagation within physical environments. The Cornell Box experiments have come to symbolize our approach to physically based rendering, it is a simply physical environment for which they have measured lighting, geometry and material reflectance properties. Digital, or synthetic images of this environment are created and compared to confirm accuracy of our simulations with 3D software.

A photograph of the original physical Cornell Box.
For this project you will create a scene to simulate the Cornell Box. You will create an environment, objects, textures, a light source and explore the rendering software available in Maya to try and recreate the photo we see above.

A Cornell Box created by Seth Wilson using Maya. This scene contains the famous Utah Teapot. Textures are made with blinn, lambert, phong, the light is a point light using depth map shadows, the scene was rendered with Mental Ray
Cornell Box Project Part 1: Creating The Scene
  1. Open Maya and create a new scene
  2. Create a cube that is perfectly square, turn on Component Selection and delete the front face of the cube so you have a box
  3. Create 2 more cubes and scale/stretch and move them into position to act as your pedestals in the scene
  4. Create a cylinder, sphere, triange or cone and other primitive objects and arrange them in your scene as above using the move and scale tools
  5. Create a cube and flatten it with the scale tool, position it on the roof of your box to act as a "light" later on
  6. Open your Hypershade window (Window Menu/Rendering Editors/Hypershade) and create 2 materials using the Lambert material, make one have a red color and one green. Double click the material to see the material settings
  7. Select your box and turn on Component Selection, select the right face inside the box and apply your red Lamber material, then select the other side and apply the green Lambert material. Select the face first, then right-click on your Material and choose "Assign Material to Selection" to apply it to that face
  8. Create a point light and move it to the top of the inside of your box using the move tool. Turn on "Use All Lights" in your view options to see it affect your scene
  9. Render your scene and check the quality, if your light is illuminating the scene your are doing great!
  10. Close your Render Window
  11. Open your Hypershade window again and create different materials for each of the objects in your scene, try a blinn, a lambert, a phong and try creating a 2D texture such as a checkerboard patter
  12. Select an object first, then right-click on your Material and choose "Assign Material to Selection" to apply it to that object
  13. To make your roof light cube glow, create a blinn material and set it to have a white color, set the illumination to half way to make the object bright, scroll down to the Special Effects section of the blinn material and set the Glow Intensity to 0.010 and apply the blinn to your roof light cube
  14. Under the Create menu, create a Camera
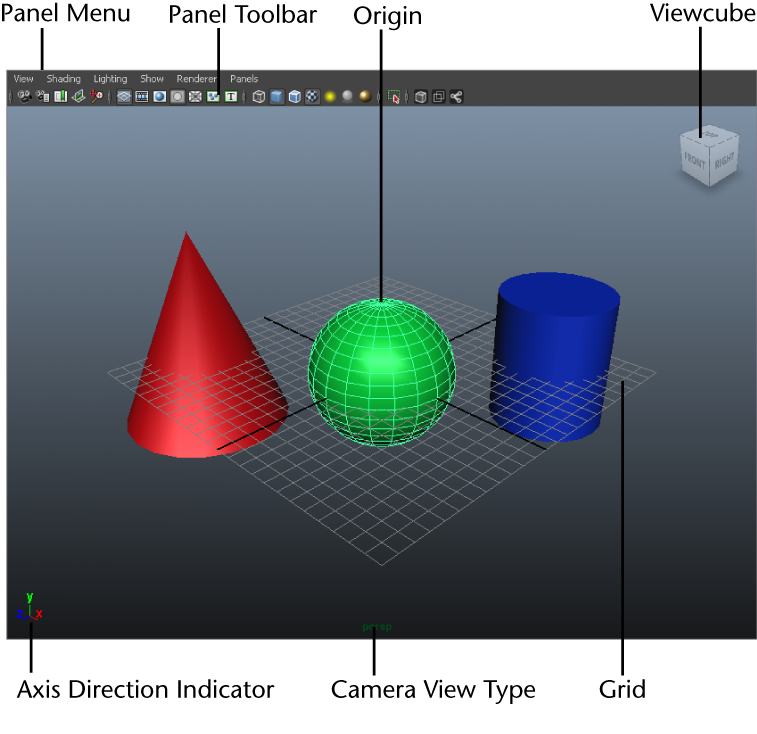
  15. Change your view point to see through your camera, it will be called Camera1 and it is under the Perspective submenu in the Panel menu of your view window
  16. Center your camera to view your scene straight on
  17. Click the render button to see what you get! Compare with your classmates results


Cornell Box Project Part 2: Render Settings

  1. Your scene may not look like mine yet, that is because we must change some render settings for best results. Go to the Window Menu and under Rendering Editors choose Render Settings and you will see the Render Setting Dialog Box
  2. Under the "Common" tab scroll down to Image Size and set it to 1K square, this will make your render square, notice there are other settings for different resolutions, such as common HD video and film dimensions
  3. On the top of the dialog box, there is a pull-down menu next to the text "Render Using", change the pull down menu to Mental Ray, now there are new tabs available to peruse
  4. Under the Quality Tab choose Final Gather, open up the Raytracing section and set reflections and refractions to 10, Max Trace Depth to 20, Shadows to 2 and Blur Limits to 1
  5. Under Features make sure that Global Illumination, Raytracing, Final Gathering, Shadows are all checked on, along with the other defaults
  6. Under the Indirect Lighting tab make sure Global Illumination is checked on, set Accuracy to 500
  7. Under the Indirect Lighting tab make sure Final Gathering is Check on, Accuracy set to 1024, Point Density to 1.00
  8. Under the Indirect Lighting tab, open Final Gathering Map, set Rebuild to On
  9. Its a good idea to save these render settings as a Preset so you can call them up again later for other projects
  10. Now close the Render Settings, save your file
  11. Click the Render button and see what kind of results you get, there should be a serious improvement over the previous render
  12. Save your render as an image from the Render window to look at later so you can lean back and admire your hard work!


Cornell Box Project Part 3: Animate Your Camera

  1. Spend some time fine tuning your render and scene to make sure it looks it's best, adjust lights, textures and positioning before proceeding
  2. Bring up your camera view and center it on your box with the camera move tools
  3. In your time line enter 60 frames into the duration field and drag your time slider out so all frames are visible in your timeline
  4. On frame 1, with your camera selected (you can select it by clicking on it in the outliner or another view window) press the "S" key to create a keyframe. A red line will appear on your timeline to show that a keyframe has been created
  5. Slide your time line down to frame 60 and then use the camera move tools to zoom your camera into your scene, add a slight pan to your camera move as well to add a little dimension.
  6. With the camera still selected press the "S" key to make a second keyframe on your timeline
  7. Press the play button to preview your camera move and adjust if needed, you should have a nice slow movement like the one above
Cornell Box Project Part 4: Set Up Your Project Folder

  1. Rendering an animation requires setting up a project folder which contains your maya file and a set of folders for containing all the required materials, files and assets in a maya project. Your project may not utilize these resources but maya needs this file/folder structure anyway and it is not possible to render animated frames without them
  2. Close Maya and make a new project folder on your computer, place your cornell box maya file inside it and open the file by double-clicking on it.
  3. After your file is open go to the File Menu / Projects / New and your will see the project set up dialog box
  4. In the Name Field type in a name for your project, this should be something like CornellBox_Project
  5. Verify that the location is correct, click browse and navigate to your project folder if needed
  6. On the bottom of the dialog box, click Use Defaults and you will see the folders names being created
  7. Click Accept to complete
Cornell Box Project Part 5: Render Your Animation

  1. With your maya file still open, go to the Window Menu / Rendering Editors / Render Settings
  2. In the Common Tab set up your options for your animation. under File Output set the Frame/Animation ext to name#.ext
  3. Set Image Format to Maya IFF
  4. Scroll down to Frame Range and enter your start and end frames, start should be set to 1 and end should be set to 60
  5. Scroll down and set Renderable Camera to Camera1, your animated camera
  6. Choose your image size from the preset pull down menu, I used a 1K Square image for my own example above
  7. Close the Render Settings window
  8. Press and hold the Space Bar to bring up the Maya Marker Menu, click on the Render Menu and choose Batch Render, Maya will now begin to render your animation, this may take awhile depending on how long it takes to render each frame
  9. When the render is done maya will give a message that says Render Completed in the Mel Script window
  10. When your render is done open your project folder and look in the images folder to see your frames
  11. Open the Fcheck program (located in the autodesk/maya folder in your applications folder) and load the IFF file sequence you just created to check for quality
  12. You may use Fcheck to export a quicktime file, or you can use a program like After Effects to create a video file from your animated sequence
  13. Turn in a quicktime file of your animation and pat yourself on the back! Woo!

Saturday, September 27, 2014

Getting Oriented to the 3D World of Maya

Hello Students,
Today we begin a new project in using a 3D program to create computer generated imagery. We will be using Autodesk's Maya, a cutting edge program widely used in the entertainment industry. We will begin with the basics and move on to more complex projects such as creating 3D models, and adding lights, textures and cameras and animating them and move on to more complex tasks such as merging video and 3D together with motion tracking.

Maya Basics:
Find and launch Maya on your computer, then open each of the links below if safari. Read through each page of the 3 lessons below and try out the steps for your self in Maya. These lessons will teach you how to use the Maya interface, how to create and manipulate objects and how to control your objects and your view of your objects. Create something with the skills you develop here and save the file as "mayabasics_yourname.ma" and copy it to the external drive to turn it in.

Link: Getting Started with Maya

Link: Creating and Manipulating Objects


Link: Viewing and Controlling your 3D Scene


Thursday, September 18, 2014

Parallax Effect (Aka: Ken Burns Effect) Project

Hello Students,
AE has some amazing capabilities such as the ability to animate in a 3D space using 2D objects. This method is referred to as 2.5D. This method was made popular by the famous documentarian Ken Burns. The same technique is also referred to as a Parralax effect, which is a technique that shows objects that move against each other from the foreground to the background to create an illusion of depth. This is used in cinema, cartoons, video games and can even be created using HTML5 to add an creative and eye catching feature to websites.


Parallax Project (Aka: Ken Burns Project)


  • Find or take a photograph that you can animate using the 2.5D/Parallax method, this photo should be high resolution, include good amounts of detail and have a good balance of foreground and background, as a rule your photo should have at least twice the resolution of your composition
  • Open your photo in photoshop and create layers for your animation, use selection tools to isolate your foreground subject from the background. If you take your own photo make sure to take a version with no subject so you have a clean background to use and you can skip the next step
  • On the background layer in photoshop use the "fill with content aware" and touch up area with the clone tool where you need to cover up
  • Save your photo as a Photoshop document with your layers ready and import it into After Effects
  • Make sure to click "import as composition" to preserve your layers for use in AE
  • Create a new composition in AE for your project
  • Open your PSD composition and Copy/Paste the layers into your main composition
  • Enable the 3D button for all layers
  • Create a 3D camera for your scene
  • Use the camera manipulator tool to zoom into your Photograph layers and frame your "shot"
  • Using the move tool, select your subject layer and drag it on the Z axis towards the camera a little bit
  • Move the background away and scale up if needed
  • Use the camera manipulator tool to explore the range of motion that looks good, create a set of keyframes for the camera position, then move the playback head to the end of your composition and move your camera inwards and to the right or left in a subtle movement
  • Preview your animation to get the camera/layer position just right
  • Use Ease-In on your last set of keyframes to slow down the motion
  • Add a vignette, tint, depth-of-field effect or other enhancements for full credit
  • Having trouble? Try googling "parallax effect in AE" and look for a tutorial video, there are some very good and easy to follow tutorials online
Due on tuesday, have fun! - Mr.W

Thursday, September 11, 2014

Visual FX Project: Lightsaber Duel

Hello Students,
To develop our motion graphics and visual effects skills we will work in teams to shoot a short video and use After Effects to apply a lightsaber effect. There a several ways to achieve this effect and I will demonstrate them both to the class. There are tutorials listed below to illustrate effective technique. This project will utilize masks, keyframing and effects to achieve the final result.


Lightsaber Duel VFX Project:

  • Work in teams of 3
  • Shoot a short lightsaber battle sequence that consists of at least 3 different shots, don't make too many shots where the lightsabers appear or you will create too much work for yourself
  • Copy the video footage onto each team members computer, each team member must produce their own final video
  • There are 2 methods for creating the saber effect, using the Beam effect or using solids with animated masks and glow effects added, this is the preferred method and will achieve the best results
  • Add sparks, lightning or lens flares to enhance the effect
  • When complete, export your final movie and copy to mad max for credit
Resource Links:
Tutorial: Using masks and glow to create lightsaber VFX

Grading Rubric:
2 Points for smooth camera work
2 Points for effective use of VFX methods
2 Points for clean editing
2 Points for turning in on time
2 Points for good team work and participation by all team members


Due on tuesday, have fun!
 - Mr.W

Tuesday, September 9, 2014

AE Skills Continued: Demonstrate Animation Basics

Hello Students,
To re-inforce our newly developing skills in After Effects (AE) we will revisit the effects and animation tutorial to create a short series of sample animations that demonstrate different capabilities in AE.

Tutorial Link: AE for beginners - effects and animation

Animation Basics Project:
In this project you are required to read the tutorial link above and create examples of different methods and techniques of animating with AE. Your animation should use simple solid shapes or images, the key is to simply demonstrate each technique listed below. Keep your sample animations short and to the point. Total running time for project should be kept under 2 minutes.

  • Open up the link above in a web page
  • Launch AE and create a new HD composition
  • Create an animation sample using simple solid shapes or images for each of the following listed below
  • Work with your classmates to share information and discoveries
  • When complete export your sample animation movie and turn in to the external HD
  • If you are unsure refer to the tutorial page, it lists all the methods to create these samples

Create a sample key framed animation that demonstrates the ability to transform:

  • Position
  • Opacity
  • Scale
  • Rotation


Create a sample animation that demonstrates the ability to alter the velocity of a keyframe:

  • Easing into a keyframe, to slow down
  • Easing out of a keyframe, to begin slowly and speed up


Create a sample animation that demonstrates:

  • Parenting of 2 objects
  • 2-3 objects that overlap each other and show blending modes applied to change how objects blend together
  • A masked object
  • A masked object with a feather applied to the mask
  • A masked object where the mask is animated

Due Thursday - Have fun!


Thursday, September 4, 2014

Introduction to After Effects / 20 Effects Project


Hello Students,
Motion Graphics is a technique that is used to bring graphics, animation and 3D content to life. It is used in commercials, production, movies, animation and more. From the most complicated animated feature film to a simple logo animation, motion graphics makes it happen.

Tutorials - After Effects for Beginners:
Read and work through these tutorials to gain an in-depth understanding of the After Effects workflow. Don't skip any steps or skim over the material, read each and every paragraph and try out the steps yourself. Be thorough, you will be calling on these skills for the next assignment. Work through all, from intermediate to advanced.
Motion Graphics can blur the line between video, art and animation


20 Different AE Effects Assignment Details:
  • Find a short clip from one of your previous projects, output a 3-5 second clip of video from Final Cut. Use the Export > Quicktime function for best results.
  • Launch Adobe After Effects
  • Go to File > Import > Files and navigate to your clip
  • Drag your clip into the timeline and set up a composition
  • Explore the Effects menu, pick one while your clip is selected in the timeline to apply that effect
  • You can use Command-D to duplicate a clip, you can also Option-ClickDrag to make a copy.
  • Use the Text Tool to create a text object and type in the name of the Effect, shorten the Text Objects Layer in the Timeline so it only appears for that specific clip. Repeat for each clip.
  • Apply 20 different Effects to 20 different clips... explore the effects palette to modify the Effect's parameters. 
  • When done, set up your in/out markers and use Command-Control-M to "Make" a movie. You will see the Render Que... hit the Render button to save your movie.
  • Transfer your movie to my laptop via thumbdrive to turn it in
  • Files are due before end of class monday
Grading for a total of 10 points:
2.5 Points - All 20 clips created with effects
2.5 Points - Effects have labels
2.5 Points - Quicktime movie turned in and is proper video format
2.5 Points - File turned in on time

AE Effects Samples:


Have Fun!

 - Mr.W


Monday, September 1, 2014

Video Production and Animation Semester At A Glance

Hello Students,

Here is a course overview of the schedule and subject material for the semester.


Video Production and Animation : Semester At A Glance

September - Animation Principles
Week 1: Thaumatropes and Phenakistoscopes
Week 2: Animating with Photoshop, Gifs, AE Introduction
Week 3: AE for Beginners, Demonstrations, Exercises
Week 4: Lightsaber Effect in AE, AE Tutorials

October - Motion Graphics and 3D
Week 1: AE Lab for Tutorials, AE 3D Capabilities, Parallax Project
Week 2: Maya Introduction, Primitives and Box Modeling, Make a Spaceship
Week 3: Maya Textures, Lights, Cameras, Action
Week 4: Maya Project Lab - Motion Matching, Real World Object Model, Environment Model and Lighting

November - Video Editing and Production Techniques
Week 1: Intro to Video Editing, Camera Work
Week 2: Storyboarding, Production Techniques, Video Scavenger Hunt Project = Day in the Life of / Music Video w Lip Sync / Original Short
Week 3: Pre-Production / Evaluation / Production
Week 4: Production, Wrap Up, Review

December - Comedy Show Production and Final Project Kickoff
Week 1: Comedy Show UTV Production Kick off
Week 2: Pre-Production / Evaluation / Production
Week 3: Production
Week 4: UTV Production, Final Video Project Kick off =  Narrative Short, Documentary, Special Effect Thriller, Comedy

January - Final Project Production / Career Development
Week 1: Pre-Production / Evaluation / Production
Week 2: Career Development / Resume’s / Ref’s / Cover Letters / Portfolio Development, Final Projects and Portfolios Due


- Mr.W