Monday, September 30, 2013

New Assignment: Stop Motion Short


Hello Students,
Your next assignment is to create a stop motion animation. You can use a point-and-shoot digital camera, cell phone camera (as long as you can copy off the images) or a video camera that uses a still-image shooting mode.

Stop Motion Animation Project:

  • This is an individual project, no teams. Students may assist each other during the animation process.
  • Come up with a simple animation idea, stop motion with people, objects, clay, drawings etc...
  • Use a digital camera to shoot the frames of your stop motion animation
  • Image sequences can be compiled with Final Cut or After Effects and turned into an animated sequence. You could turn a sequential series of photographs into an animation by importing the the folder of images into Final Cut, and adjusting the timing afterwards
  • Animation should run between 30-60 seconds
  • Check out the samples below for some ideas
  • Project is due on Monday the 7th


Thursday, September 26, 2013

Getting Familiar with After Effects Exercise: 20 Effects


Hello Students,
Today we will learn how to bring video clips into Adobe After Effects to apply effects to them. Follow the steps outlined below to get started...

20 Different AE Effects Assignment Details:
  • Find a short clip from one of your previous projects, output a 3-5 second clip of video from Final Cut. Use the Export > Quicktime function for best results.
  • Launch Adobe After Effects
  • Go to File > Import > Files and navigate to your clip
  • Drag your clip into the timeline and set up a composition
  • Explore the Effects menu, pick one while your clip is selected in the timeline to apply that effect
  • You can use Command-D to duplicate a clip, you can also Option-ClickDrag to make a copy.
  • Use the Text Tool to create a text object and type in the name of the Effect, shorten the Text Objects Layer in the Timeline so it only appears for that specific clip. Repeat for each clip.
  • Apply 20 different Effects to 20 different clips... explore the effects palette to modify the Effect's parameters. 
  • When done, set up your in/out markers and use Command-Control-M to "Make" a movie. You will see the Render Que... hit the Render button to save your movie.
  • Transfer your movie to my laptop via thumbdrive to turn it in
  • Files are due before end of class monday
Grading for a total of 10 points:
2.5 Points - All 20 clips created with effects
2.5 Points - Effects have labels
2.5 Points - File turned in is in H.264 format
2.5 Points - File turned in on time

AE Effects Samples:


Have Fun!

 - Mr.W

Tuesday, September 24, 2013

Get Started with Motion Graphics: After Effects for Beginners


Hello Students,
Motion Graphics is a technique that is used to bring graphics, animation and 3D content to life. It is used in commercials, production, movies, animation and more. From the most complicated animated feature film to a simple logo animation, motion graphics makes it happen.

Tutorials - After Effects for Beginners:
Read and work through these tutorials to gain an in-depth understanding of the After Effects workflow. Don't skip any steps or skim over the material, read each and every paragraph and try out the steps yourself. Write a 1 paragraph summary of each tutorial and discuss the methods you discovered and techniques that the tutorials demonstrate. Be thorough, you will be calling on these skills for the next assignment, working through an intermediate to advanced AE tutorial.

Motion Graphics can blur the line between video, art and animation

Monday, September 23, 2013

Music Video Post Project Write Up


Hello Students,

Your music video scavenger hunt projects are due today.


For all team members, your next assignment is to write a 1 page review of your video project to answer these questions:
  1. List your team member names and the names of any other class participants.
  2. What were the major difficulties with your project?
  3. What technical issues did you encounter, and how did you work around or fix them?
  4. How much of your original vision ended up in your final video, and how difficult was it to adhere to your storyboard? What hurdles if any did you encounter and how did you overcome them?
  5. If you were to shoot and edit the same project again, what would you do differently?
  6. Did this project give you any cool ideas for a future project?
  7. What part of  your project took up the most time? Filming, editing, writing? Why?

Please type up your overview and print and turn in or email it to me at swilson@santacruz.k12.ca.us

- Mr. W

Monday, September 9, 2013

The Art of The Storyboard


Shot Lists:
A shot list is like a storyboard but without visuals. You simply describe the action, lighting, setting, dialogue and camera angle. 

For instance: 
  • Fade up on football field, eye level camera
  • Low camera level, player runs onto field
  • Cut to side shot, track with player

The basic idea is to create a recipe that you can follow when you go out to shoot your project...


The Art Of The Storyboard:
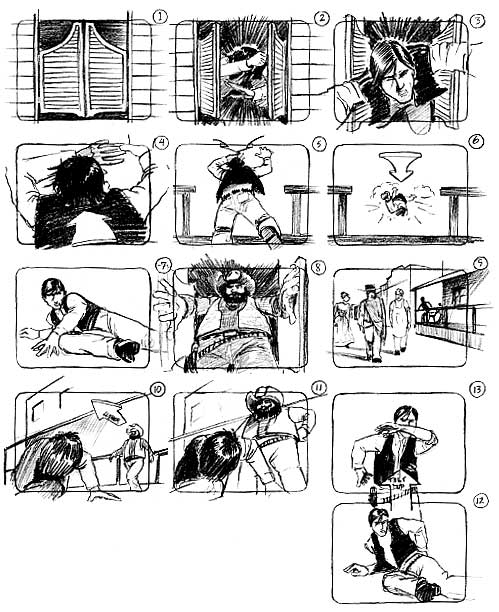
After a concept is established for a film, a script can then be created and storyboards can be executed to visualize the film. A storyboard is meant to represent the framing, action and elements in each shot in a sequence. It is a valuable tool to draw from when actual shooting begins.

Your storyboard should convey essential information:
  • What characters are in the frame, are they moving? Seated? Standing?
  • What are the characters saying, seeing or experiencing
  • How much time is passing, is it a long panning shot? Or a quick succession of shots?
  • Where is the camera? High, low? Over the shoulder? Birds-eye view? Is the camera moving or still?

After storyboard creation do not be afraid to change camera angles, dialogue etc... this is all part of the creative process.

Draw your storyboard in pencil so that some shots or text can be reworked. Your artwork does not need to be fancy, use basic shapes, stick figures and simple backgrounds.

Use language to describe camera angles and shot styles:
CLOSE-UP SHOT:   A close range of distance between the camera and the subject.
DISSOVLE: A transition between two shots, where one shot fades away and simultaneously another shot fades in. 
FADE: A transition from a shot to black where the image gradually becomes darker is a Fade Out; or from black where the image gradually becomes brighter is a Fade In. 
HIGH CAMERA ANGLE:  A camera angle which looks down on its subject making it look small, weak or unimportant. 
JUMP CUT: A rapid, jerky transition from one frame to the next, either disrupting the flow of time or movement within a scene or making an abrupt transition from one scene to another. 
LEVEL CAMERA ANGLE:  A camera angle which is even with the subject; it may be used as a neutral shot. 
LONG SHOT:  A long range of distance between the camera and the subject, often providing a broader range of the setting. 
LOW CAMERA ANGLE:  A camera angle which looks up at its subject; it makes the subject seem important and powerful. 
PAN:  A steady, sweeping movement from one point in a scene to another. 
POV (point of view shot): A shot which is understood to be seen from the point of view of a character within the scene. 
REACTION SHOT: A shot of someone looking off screen. 2.: A reaction shot can also be a shot of someone in a conversation where they are not given a line of dialogue but are just listening to the other person speak. 
TILT:  Using a camera on a tripod, the camera moves up or down to follow the action. 
ZOOM:  Use of the camera lens to move closely towards the subject.


Wednesday, September 4, 2013

New Project: Music Video Scavenger Hunt


Hello Students,
Your next assignment will be graded on your ability to accomplish 20 specific technical shots or techniques and how creative you can be within those constraints while creating a music video. Minimum video length 2 minute, 4-5 minutes max. We will discuss all these techniques and how to accomplish them in class. You will also be graded on time management, working in teams effectively and ability to meet the deadlines.

Teams will be chosen by picking numbers. Teamwork is crucial on this project, every one must participate and contribute to the final project. You will work in teams of 4.

Teams will shoot footage and share, each team member will produce their own final edit of the project for grading.

20 Video Production Techniques
Music Video Project Specifications:
1 Page proposal/pitch must be approved before production can begin.

Production Schedule:
Sept 6th - Proposal Due
Sept  9th - Script, Storyboard or Shot List Due
Sept 12th - Preliminary Shooting Complete
Sept 17th - Rough Cut Edit Complete
Sept 19th - Editing Complete


Format: The final format of your video project will be a music video. Music is the choice of the editor but must be classroom safe in lyrical content.

Grading: For full credit your video project must contain one example of the 20 shots listed below. Camera work should be smooth and steady. Editing should be well timed and without edit glitches or gaps. Must have titles and tails. All deadlines listed above must be met on time.

Note: Each team member must take turns shooting and acting. Outside actors or camera operators allowed. Teams may help each other for difficult shots. All project storyboard/scripts/shot lists must be approved by me before production can begin.

Each team member is responsible for editing their own final version of the video, no group efforts with editing.

A shotlist and storyboard must be created and the final video must contain 1 example each of the shots or effects listed below:


1. Silhouette Shot - actor or actors must be silhouetted against a background


2. Green Screen Shot - actor or actors shot against green screen, background must be keyed out and replaced with background still image or video


3. Single Source LighCloseup - actor or actors shot closeup with single light source for high contrast


4. Shadow Shot - camera shows shadow only, can pan up to actor after, or show interaction between two characters through shadow only


5. Twins - use static camera and split screen effect to show actor and a "double"


6. Window Illusion - overlay semi-transparent video over actor or actors to simulate window reflection


7. Frame Within A Frame - look for environments or architecture that "frames" your actor or actors


8. Background Slide - use a sideways camera movement to give the impression that the background is moving behind your actor or actors


9. Handheld Dolly Shot - follow the action with a handheld shot, must use a tripod as a counterweight to reduce camera shake, change camera height during shot


10. Fall Away - camera walks backwards from actor or actors


11. Walk In - shot begins on actor 1, in the foreground or background actor 2 steps into frame


12. Camera Flow - shot begins with Handheld Dolly Shot following actor 1 walking to the right, actor 2 passes in foreground going in opposite direction and camera changes direction to follow actor 2. This change in direction can happen 2-3 times


13. Spin Shot - camera spins around actor or actors 360 degrees


14. Motionless Camera - camera is tripod mounted, focus on motion in scene, all actor or actors must be moving. extras can help add energy to a scene


15. Whip Cut - camera quickly sweeps away from scene, edit is made to seem like camera ends on a second scene, also called a sweep cut


16. Slow Motion - Video source is slowed down by 75%. slowing down any more can be done but render time is increased. Ask me how to do extreme slow motion with Adobe After Effects.


17. Pass Through Wall - Camera moves up to wall, fades to second shot inside moving towards center of room. Can also be pass through window, pass through keyhole etc...


18. Extreme Angle - camera angle has extreme foreshortening or perspective


19. Saturated Color Background - actor or actors are shot against a background of mostly a single vivid color, such as a brightly colored wall, green grass, etc...


20. Textured Background - actor or actors shot against textured background, brick wall, fence posts, tree bark, ivy etc...

Extra information about these shots can be researched online... have fun!

- Mr. W