Tuesday, December 11, 2012

Special Guest Speaker: Steve Voizin from SOV Interactive


Yesterday our class was honored to host Steve Voizin as a special guest speaker. Steve is owner and operator of SOV Interactive, a media development company located in the San Lorenzo Valley. Steve is a visual designer and creative director for desktop, web, video and mobile projects. Steve provides his clients with elegant interactive multimedia marketing solutions, cutting edge collateral and has a passion for graphic design, typography and color theory. Steve shared his time with our class to discuss his work and career path and showed portfolio examples and behind the scenes images from his client projects.

About SOV Interactive:
SOV Interactive LLC, is a multimedia company that provides the marketing and advertising services to promote the particular lifestyle related to the product. The company was founded in 1999 and SOV Interactive is a cutting edge, independent digital media studio, specializing in motion graphics, video production, flash design, web engineering, and multimedia presentation services. SOV Interactive currently operates as an LLC in the State of CA. Steve Voisin, the chief creative office and business owner, has over fifteen years of professional multimedia experience working with major consumer and entertainment companies producing digital marketing collateral for events, trades shows, advertising, sales demos, and product launches. His goal is to offer “Highest Quality at half the price”. All of SOV's staffing are consultants and our company operates on a lateral and global level, where everyone has an equal part and voice on our creative projects.

Our class extends a big thank you to Steve Voizin for sharing his time... Thank You Steve!

  - Mr.W

Saturday, November 17, 2012

Special Guest Speakers Jono Schaferkotter and Vanessa Tomasello

Vanessa Tomasello and Jono Schaferkotter
This week our video production class was honored to host two special guest speakers, Filmmaker and multi-media artist Jono Schaferkotter and producer and owner of The Design Jungle, Vanessa Tomasello. Jono was kind enough to share his time and give two guest lectures about the storytelling process in film and guided the class through the creation of a beatsheet for our next class project. Jono returned with Vanessa to give another lecture about screenplay development and stayed to help the student teams work on their film concepts and screenplays. The class extends a big thanks to Jono and Vanessa for sharing their time, knowledge and expertise with us.
About the Guest Speakers:
Jono Schaferkotter is an artist whose work easily jumps mediums and genres. His portfolio includes large-scale paintings, mixed-media sculpture, interactive art installation, multi-media choreography and much more. In the last decade, he's created three feature length films, an internationally award winning short, music videos, international documentaries and numerous award-winning commercials. Recently, he has expanded his horizons, tackling both the world of fiction with his new novel and developing his skills as a singer/songwriter. His work has taken him around the world. While he primarily works out of San Francisco (and more recently, New York), in the last few years, he's traveled and lead teams filming in Kenya's Rift Valley Region, Tokyo and the Heilongjiang Province of China.
Vanessa Tomasello is a producer, editor and owner of The Design Jungle, a local video production house that specializes in creation of stunning corporate media for video game trailers,  corporate branding videos, product and tech demos and web campaigns.

Wednesday, November 14, 2012

"The BIG Project" Phase 1: Loglines and BeatSheets

Hello Students,
This next project will be the most in-depth attempt to date for our class. You will be working in teams to create an original narrative short film or documentary. Your project will utilize story development and screenplay development techniques to create a video that is engaging, well produced and follows a 3 act story line.

The BIG Project
Project Specifications:
Format: The goal of this project is to create a compelling narrative, either fictional or factual (documentary) short video. Work in teams of 3.

Grading: Your project should reflect the skills and knowledge you have developed throughout the semester. Camera work must be smooth. Audio must be appropriate and well mixed. Edits must be used properly. Direction should show use of production techniques learned in our scavenger hunt video, use different angles, closeups, midrange shots, wide shots etc. 

Note: Teams are encouraged to recruit help for their projects, stagehands, actors etc... Teams may help each other. Make sure any volunteers are committed. All project beatsheets/storyboards/scripts/shot lists must be approved by me before production can begin.

Each team member is responsible for editing their own final version of the video, no group efforts with editing. Special exemptions made for difficult special effects sequences, must have prior approval.

Phase 1, Brainstorm and Create a BeatSheet:
Deliverable: Create a proposal for your teams film by brainstorming ideas for your short film and create a Logline and Beatsheet to develop your 3 act story arc. Follow the worksheet below to make your idea fit into the Beatsheet format.

Script Title (Your script or movie title)
____________________________________________________________
Logline (A catchy, one-sentence summary of your script) 
Beat 1—Opening Scene 

The opening scene is an opportunity for you to give the audience the starting point of the protagonist’s journey. It can be an image of your protagonist, an important setting, a revealing conversation between characters, an object that is essential to the plot, etc. This should give your audience a “snapshot” of what the rest of your film might look like, or what your film is all about. The opening image in the Wizard of Oz depicts Dorothy and Toto running down a dirt road with storm clouds approaching in the background. Once you watch the whole film, you realize how important that first scene really is. And remember, just like the first page of a novel needs to draw the reader in, the opening image of a script needs to draw the audience in. (Describe your opening image in the space below.)

Beat 2—Setting Up the Story 

All the important characters (your protagonist, antagonist, and supporting characters) in your main plot will be introduced during the first ten pages, or at least hinted at. You want your audience to know all your characters’ strange tics and behaviors—basically, what makes your characters unique. You will also want to set up your conflict (or what your protagonist wants more than anything and how his or her fears and antagonist are in the way of him or her getting it.) By page ten, your audience needs to fall in love with your characters enough to care about their conflict. (Below, brainstorm character behaviors and events that you might need to write into your script in order to set up your conflict.)

Beat 3—Inciting Incident 

In the set-up, you have told us all about the world of your script. The inciting incident (also known as the catalyst) will turn that world upside down. Protagonists get fired, find out they have a long lost brother, get news that they have three days to live, meet the girl or boy of their dreams, get blown somewhere over the rainbow by a powerful tornado, etc. This is what forces your protagonist out of a daily routine and into the adventure of a lifetime. (Describe your inciting incident in the space below.)

Beat 4—The Big Decision

Page 25 is the point of no return. From page 10 until then, your protagonist should be debating whether to embark on his or her journey or just continue living his or her uneventful, everyday life. Unless you want to write a really boring script, your protagonist will choose the more dangerous and exciting path towards his or her goal. But just like it might be hard if you had to decide to leave everything behind, it will be a hard decision for your protagonist. (Below, write two lists from your protagonist’s point of view. One stating why he or she should stay, and one stating why he or she should embark on the adventure.)

Reasons why I should stay:
Reasons why I should embark on the adventure: 

Beat 5—Into the Wide Unknown 


This is a big moment for your protagonist, and you want to make sure that your audience knows it. He or she is leaving the old world behind, and stepping into a dangerous and unknown world to embark on the adventure. Because these two worlds are so distinct, the act of actually stepping into the new one must be unmistakable. A great example of this is in The Wizard of Oz when Dorothy steps out of her house and into the Munchkin City. (Below, describe the moment where your protagonist steps into the new world.)

Beat 6—Subplot 

The subplot, also known as the “B story,” is oftentimes a love story involving the protagonist, but it can also be based around supporting characters or even a brand new gang of characters. The subplot will make your script more dynamic or exciting; the more subplots you have, the more fun your film will be to watch. (Using the space below, brainstorm some ideas for various subplots and how to introduce them into your script. You may want to go back to your “Supporting Character Worksheets,” and see what each of them wants more that anything in the world.)

Beat 7—Having Fun and Getting to Know Your Characters 

This is the portion of a film where most of the trailer clips come from. As you might guess, this part of the script is more upbeat; it is less about “your characters moving towards an end goal” and more about “your characters having fun and getting to know each other.” This does not mean that it is less important. This part of your script helps your audience get to know what your characters and your story are all about. For example, this is the part of Wizard of Oz where Dorothy sings and dances with her newly-found friends along the Yellow Brick Road. (Write out some rising action that might fit into this section of your script in the space below.)

Beat 8—The 50% Mark 

The fun and games are over, and it is time to get back to the story. The midpoint of your script can be tricky. It is said that, at this point in your script, your protagonist either reaches a point where he or she thinks that things can’t get any better or any worse. The trick is that neither is true. The movie is only halfway over, and things are going to get worse before they are going to get better. This is the moment when Dorothy looks across the poppy field and sees the Emerald City. Though it looks like her journey is almost over, it has only just begun! (Below, describe the midpoint of your script.)

Beat 9—The Antagonist Returns! 

Your protagonist has already had some run-ins with the antagonist, and has been successful so far in keeping him or her out of the way. At the 50% Mark, your protagonist may believe that he or she has seen the last of the “bad guy or gal.” Unbeknownst to your protagonist, the antagonist has been getting ready to come back with a vengeance. (Describe how your antagonist rears his or her ugly head again in your script in the space below.)

Beat 10—The “All is Lost” Moment 

Just like the 50% Mark, the “All is Lost” Moment is a false defeat. Everything that could go wrong has gone wrong. The antagonist has come back with a bigger army and a brilliant game plan right when your protagonist thought all his or her problems were gone for good (or when he or she thought that things could not get any worse). After such a huge defeat, it is no wonder your protagonist is ready to throw in the towel and give up on his or her dreams. (Describe the “All is Lost” Moment in your script below.)

Beat 11—The “Ah Ha!” Moment 

This is the moment when your protagonist pulls him or herself off the floor and back into action. Oftentimes, with the help of the supporting characters, he or she will come up with a brilliant plan (Ah ha!) to finally defeat the antagonist—this time for real. (Describe the “Ah ha!” moment of your script below.)

Beat 12—The Final Push 

These final pages of your script typically contain your climax, falling action, and your resolution. This is where your protagonist learns to overcome his or her fears in order to defeat the antagonist, consequently changing—and sometimes even saving—the world! (Describe all the events that make up your climax, falling action, and your resolution below.)

There is a lot of information here. Also, this is a “formula.” It is something that many screenplay writers use to write their scripts, but it not a requirement. You can write an “off-beat” film by rearranging all the beats or by making some longer and others shorter. 

Thursday, November 1, 2012

After Effects Tutorials: Advanced

Hello Students,
Your next assignment is to choose an advanced motion graphics tutorial that can be completed with Adobe After Effects. Choose one from the list below to work through, or research websites like aetuts.com or videocopilot.com, make sure the tutorial you choose only requires After Effects and don't require any 3rd party plugins or programs. You will need to shoot your own sample footage to use with these tutorials, put some time into it and make it look great!


Difficult!!!  ---> Adobe After Effects Tutorial: Track Your Golf Swing


Adobe After Effects Tutorial: Light Rays


Adobe After Effects Tutorial: Fairly Realistic Fire with CC Particle Generator


Adobe After Effects Tutorial: Floating Hologram Effect


Adobe After Effects Tutorial: Droste Effect - Endless Zoom

Have fun! - Mr.W

Monday, October 29, 2012

Motion Graphics: After Effects for Beginners

Hello Students,
Motion Graphics is a technique that is used to bring graphics, animation and 3D content to life. It is used in commercials, production, movies, animation and more. From the most complicated animated feature film to a simple logo animation, motion graphics makes it happen.

Tutorials - After Effects for Beginners:
Read and work through these tutorials to gain an in-depth understanding of the After Effects workflow. Don't skip any steps or skim over the material, read each and every paragraph and try out the steps yourself. Write a 1 paragraph summary of each tutorial and discuss the methods you discovered and techniques that the tutorials demonstrate. Be thorough, you will be calling on these skills for the next assignment, working through an intermediate to advanced AE tutorial.

Motion Graphics can blur the line between video, art and animation

Friday, October 19, 2012

Stop Motion Title Animation


Hello Students,
Your next assignment is to create a stop motion animated title for your scavanger hunt project. You can use a point-and-shoot digital camera, cell phone camera (as long as you can copy off the images) or a video camera if it has a still-image mode.

Stop Motion Animation Project:
  • This is an individual project, no teams. Students may assist each other during the animation process.
  • Come up with a simple animation idea, stop motion with people, objects, clay, drawings etc, the animation should crescendo into a readable title for your project.
  • Image sequences can be compiled with After Effects, Premiere or Photoshop
  • Animation should run between 7-10 seconds
  • Project is due on Thursday

Monday, October 1, 2012

Attention Young Entrepreneurs!


Hello Students,
Do you have a great idea that could evolve into a new business, industry or service? Apply now to join the 2012 YEP Business Plan Challenge!
STUDENTS:
Do you have a BIG IDEA for starting a business?
Maybe it's an idea for:
  • A new or better product?
  • A new or better service?
  • A new way to help the environment?
  • A new way to raise money for an important cause?
Starting a business is a great way to build your skillset while getting one step closer to BEING YOUR OWN BOSS! Don't forget, the Youth Entrepreneurship Program is here to help you every step of the way. Once you've formed your team and applied, you'll receive specialized coaching and mentoring from small business experts to help you succeed!

RULES:
  • Deadline to enter is Friday, October 5, 2012
  • Teams must consist of 2-5 members
  • Members must be current Santa Cruz or Monterey County high school students
  • Each Business Plan Challenge! team member must complete this application
To enter follow this link: http://www.southbaybec.org/yepchallenge

Friday, September 28, 2012

New Project: Video Scavenger Hunt

Hello Students,
Congratulations on your freestyle video projects, the results were great, and yet we can always be better, That's where our next assignment comes in.

Your next assignment will be graded on your ability to accomplish 20 specific technical shots or techniques and how creative you can be within those constraints. Minimum video length 2 minute, 4-5 minutes max. We will discuss all these techniques and how to accomplish them in class. You will also be graded on time management and ability to meet the deadlines.

Teams will be chosen by picking numbers. Teamwork is crucial on this project, every one must participate and contribute to the final project. You will work in teams of 3.

20 Video Production Techniques
Project Specifications:
1 Page film proposal/pitch must be approved before production can begin.

Production Schedule:
Oct 1st - Proposal Due
Oct  3rd - Script, Storyboard or Shot List Due
Oct 10th - Preliminary Shooting Complete
Oct 12th - Rough Cut Edit Complete
Oct 17th - Editing Complete


Format: The final format of the video is your choice, it could be a music video, action video, narrative or experimental. You could even make an instructional video about these video production techniques.

Grading: For full credit your video project must contain one example of the 20 shots listed below. Camera work should be smooth and steady. Editing should be well timed and without edit glitches or gaps. Must have titles and tails. All deadlines listed above must be met on time.

Note: Each team member must take turns shooting and acting. No outside actors or camera operators allowed. Teams may help each other for difficult shots. All project storyboard/scripts/shot lists must be approved by me before production can begin.

Each team member is responsible for editing their own final version of the video, no group efforts with editing.

A shotlist and storyboard must be created and the final video must contain 1 example each of the shots or effects listed below:


1. Silhouette Shot - actor or actors must be silhouetted against a background


2. Green Screen Shot - actor or actors shot against green screen, background must be keyed out and replaced with background still image or video


3. Single Source LighCloseup - actor or actors shot closeup with single light source for high contrast


4. Shadow Shot - camera shows shadow only, can pan up to actor after, or show interaction between two characters through shadow only


5. Twins - use static camera and split screen effect to show actor and a "double"


6. Window Illusion - overlay semi-transparent video over actor or actors to simulate window reflection


7. Frame Within A Frame - look for environments or architecture that "frames" your actor or actors


8. Background Slide - use a sideways camera movement to give the impression that the background is moving behind your actor or actors


9. Handheld Dolly Shot - follow the action with a handheld shot, must use a tripod as a counterweight to reduce camera shake, change camera height during shot


10. Fall Away - camera walks backwards from actor or actors


11. Walk In - shot begins on actor 1, in the foreground or background actor 2 steps into frame


12. Camera Flow - shot begins with Handheld Dolly Shot following actor 1 walking to the right, actor 2 passes in foreground going in opposite direction and camera changes direction to follow actor 2. This change in direction can happen 2-3 times


13. Spin Shot - camera spins around actor or actors 360 degrees


14. Motionless Camera - camera is tripod mounted, focus on motion in scene, all actor or actors must be moving. extras can help add energy to a scene


15. Whip Cut - camera quickly sweeps away from scene, edit is made to seem like camera ends on a second scene, also called a sweep cut


16. Slow Motion - Video source is slowed down by 75%. slowing down any more can be done but render time is increased. Ask me how to do extreme slow motion with Adobe After Effects.


17. Pass Through Wall - Camera moves up to wall, fades to second shot inside moving towards center of room. Can also be pass through window, pass through keyhole etc...


18. Extreme Angle - camera angle has extreme foreshortening or perspective


19. Saturated Color Background - actor or actors are shot against a background of mostly a single vivid color, such as a brightly colored wall, green grass, etc...


20. Textured Background - actor or actors shot against textured background, brick wall, fence posts, tree bark, ivy etc...

Extra information about these shots can be researched online... have fun!

- Mr. W

Tuesday, September 11, 2012

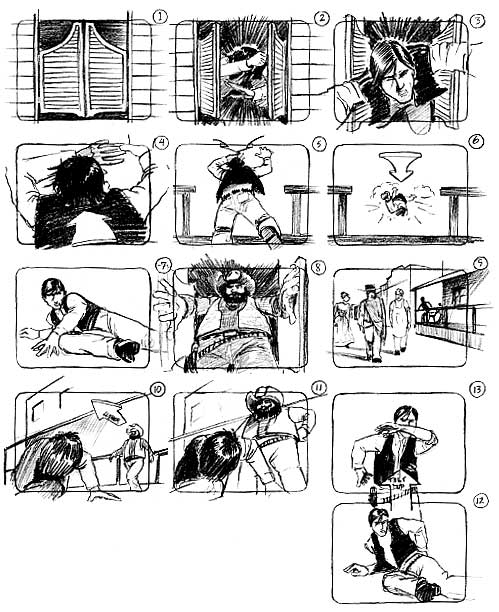
The Art of the Storyboard


Shot Lists:
A shot list is like a storyboard but without visuals. You simply describe the action, lighting, setting, dialogue and camera angle. 

For instance: 
  • Fade up on football field, eye level camera
  • Low camera level, player runs onto field
  • Cut to side shot, track with player

The basic idea is to create a recipe that you can follow when you go out to shoot your project...


The Art Of The Storyboard:
After a concept is established for a film, a script can then be created and storyboards can be executed to visualize the film. A storyboard is meant to represent the framing, action and elements in each shot in a sequence. It is a valuable tool to draw from when actual shooting begins.

Your storyboard should convey essential information:
  • What characters are in the frame, are they moving? Seated? Standing?
  • What are the characters saying, seeing or experiencing
  • How much time is passing, is it a long panning shot? Or a quick succession of shots?
  • Where is the camera? High, low? Over the shoulder? Birds-eye view? Is the camera moving or still?

After storyboard creation do not be afraid to change camera angles, dialogue etc... this is all part of the creative process.

Draw your storyboard in pencil so that some shots or text can be reworked. Your artwork does not need to be fancy, use basic shapes, stick figures and simple backgrounds.

Use language to describe camera angles and shot styles:
CLOSE-UP SHOT:   A close range of distance between the camera and the subject.
DISSOVLE: A transition between two shots, where one shot fades away and simultaneously another shot fades in. 
FADE: A transition from a shot to black where the image gradually becomes darker is a Fade Out; or from black where the image gradually becomes brighter is a Fade In. 
HIGH CAMERA ANGLE:  A camera angle which looks down on its subject making it look small, weak or unimportant. 
JUMP CUT: A rapid, jerky transition from one frame to the next, either disrupting the flow of time or movement within a scene or making an abrupt transition from one scene to another. 
LEVEL CAMERA ANGLE:  A camera angle which is even with the subject; it may be used as a neutral shot. 
LONG SHOT:  A long range of distance between the camera and the subject, often providing a broader range of the setting. 
LOW CAMERA ANGLE:  A camera angle which looks up at its subject; it makes the subject seem important and powerful. 
PAN:  A steady, sweeping movement from one point in a scene to another. 
POV (point of view shot): A shot which is understood to be seen from the point of view of a character within the scene. 
REACTION SHOT: A shot of someone looking off screen. 2.: A reaction shot can also be a shot of someone in a conversation where they are not given a line of dialogue but are just listening to the other person speak. 
TILT:  Using a camera on a tripod, the camera moves up or down to follow the action. 
ZOOM:  Use of the camera lens to move closely towards the subject.


Wednesday, September 5, 2012

Project #2: Freestyle

Todays Agenda:
  • Video Pass 
  • Professional Conduct 
  • Camera Techniques 
  • New Assignment: Freestyle Video Project

Freestyle Video Project:
Your new assignment is to create an original 2 minute video. Video concepts must be approved by me, and then proposals must be completed before time can be scheduled for shooting. We have limited camera's so everyone will have to pre-plan a shooting schedule. You will work in teams of two for this project. Your team must follow all phases of the project and meet all requirements. All teams are expected to work during class time, if you aren't shooting video than you should be editing, working on title animations, learning after effects and working through tutorials, creating graphics etc.


Subject matter, style and technique are wide open. Consider that almost anything can be turned into a video. You could make a video about what people eat for lunch, what cars they drive, you could make a short documentary, music video, experimental video etc. Let's discuss your concepts and ideas.

Project Phases:
  • Choose team members
  • Brainstorm project ideas
  • Write a 1 page project proposal
  • Upon approval write a shot list or draw a storyboard for your video (pre-production)
  • Schedule and begin shooting upon storyboard approval (production)
  • Edit and create titles, add audio and music, etc... (post production)

Project requirements:
  • Keep TRT (Total Running Time) below 2 minutes
  • Video project must match original proposal/storyboard or shot list
  • Appropriate content only, including music selects
  • Proposal and Storyboards must be approved by me
  • Smooth camera work
  • Clean editing and titles

Schedule:
  • Proposals due Monday the 10th
  • Storyboards or Shot lists due Wednesday the 12th
  • Videos due at E.O.C. on Wednesday the 19th

Make sure you use class time wisely to stay on task and on schedule, late projects will have points deducted.

- Mr.W

Wednesday, August 29, 2012

Project #1: Introduction to Editing


Hello Students,
Today we will set up your workstations and begin our introduction to video editing with Adobe Premiere. You will be editing pre-shot footage to create a fun and compelling promotional tourism spot for the city of San Francisco.

Part 1 - Learning Adobe Premiere:
  • Launch Adobe Premiere
  • Watch videos 1 through 13 in the "Learning Premiere Pro" section of the Adobe TV website
  • Practice the steps that you can as you watch the videos
  • Find a sample video file to practice editing, color correction, outputting, etc...
  • If you can watch all 13 videos you are on your way to being a video editing pro! When complete watch the other videos in that section to learn how to process and distribute your movie files


Part 2 - Editing a Promotional Tourism Video for the City of San Francisco

Project Concept: The City of San Francisco has hired you to edit a promotional tourism video. They have provided you pre-shot footage and your job is to make it sing! Your commercial will play on local television stations coast to coast, so it should have universal appeal. Your commercial should promote the unique sights that the city has to offer.
  • Your final video file should be exactly 1 minute long
  • Use music that fits the energy of your video
  • Edit your video cuts to be timed with the music
  • Use color correction to enhance the footage
  • Use video transitions to keep the video compelling and interesting, but be careful not to overuse them or repeat them too many times
  • Create text titles to create a "call to action" at the end of your video, something like "Visit beautiful San Francisco today!"
  • Have fun!

- Mr.Wilson

Welcome to ROP Video Production

Hello Students,
Welcome to ROP Video Production for the 2012-13 School Year!
Todays Agenda:

  • Orientation
  • Introductions
  • Class Policy
  • Course Description
  • Demo Reel and Work Examples
- Mr. Wilson

Tuesday, June 12, 2012

Thank You Video Production Class of 2017

Thank You Video Production
Thank you to all my great students from this years Video Production and Animation class. There were some very impressive portfolios and projects and I thank you all for your hard work and dedication.


This blog will go live again for the fall semester.

- Mr.W

Monday, June 4, 2012

Extra Credit Mini-Project: Be Serious for 30 Seconds

Hello Students,
Your last chance to gain some extra credit in this class is to create a video for Fred Armison's Participatory Video Project: Be Serious for 30 Seconds.


Be Serious for 30 Seconds Mini Project:

The Rules:
  • Rule 1: It has to be serious.
  • Rule 2: It has to be 30 seconds or less
  • Rule 3: No more than 2 people in it (teams of 3)
  • Rule 4: At least 1 5 second dramatic pause
  • Rule 5: At least 1 cutaway to an object
  • Rule 6: Do your best acting
  • Rule 7: It needs to have a door slamming
Have fun!

- Mr.W

Wednesday, May 16, 2012

ROP End Of Year Course Survey


Hello Students,
With current legislation regarding education in California and a looming budget crisis for California schools, it is more important that ever that we gather information about your experiences in ROP courses and your future plans for education and career.


Please click the link below and fill out the survey. It takes about 3 minutes and is very important to ensure that ROP courses are made available for future classes.

Link: ROP End Of Year Course Survey

Thank you,
- Mr.W

Thursday, May 3, 2012

New Assignment: Video Yearbook Project

Hello Students,
Your new assignment is to create a yearbook video to highlight and capture the activities on our lovely campus. This project has a part A (shooting/recording video footage and sharing it) and a part B (editing your own video).

Project Overview:
In 10 or 20 years what will you remember most about High School? What will be your fondest memories? For many it is the bonds of friendship that we create, for others it is the trappings of student life, dress styles, hair styles, technology, teachers, environments, sports, events etc. Your challenge is to take the best pieces from our collection of footage and edit a great video together. Think of some great music to edit your video with and create a memorable project. We will choose our favorite to possibly post to the school website.

Video Yearbook Assignment:
Part A: Footage
  • Each student must shoot a minimum of 10 minutes of footage to add to our collection
  • When you are done shooting, copy your footage to our hard drive
  • Catalog your footage, is it sports footage? Interviews? Clothing and Style images? Messages to the future?
What to shoot?
B-Roll: This is footage that can be used as "filler" or as a visual narrative. Students coming to and from classes, working in class, teachers teaching, students working on projects and having fun, smiling faces etc.
Interviews: Interview teachers, faculty and students. Ask them to discuss their roles, activities, memories. They can send a message to themselves.
Catagories:
  • Current Events
  • News
  • Fashion, headgear, jewelry, shoes
  • Tech and gadgets
  • Language, slang
  • Popular culture, movies, tv, music
  • Teachers
  • Faculty
  • Events, dances, fund raising, proms
  • Clubs
  • Sports & teams
  • Spontaneous activities during breaks or lunch
Part B: Editing your video
  • Each student is responsible for editing a final video. We will review them in groups and pick our favorites for a final round of judging
  • Use all the techniques you have learned to make a great video, nice titles, animation, music, rapid fire editing, keep audio levels smooth
  • Final video is due on Monday the 21st
Have fun!
- Mr.W