Monday, October 19, 2015

The Art of The Storyboard

Students,
For our video projects you may be asked to create storyboards or shot lists, read through the content below to get started on your own boards/lists:

Shot Lists:
A shot list is like a storyboard but without visuals. You simply describe the action, lighting, setting, dialogue and camera angle. 

For instance: 
  • Fade up on football field, eye level camera
  • Low camera level, player runs onto field
  • Cut to side shot, track with player

The basic idea is to create a recipe that you can follow when you go out to shoot your project...


The Art Of The Storyboard:
After a concept is established for a film, a script can then be created and storyboards can be executed to visualize the film. A storyboard is meant to represent the framing, action and elements in each shot in a sequence. It is a valuable tool to draw from when actual shooting begins.

Your storyboard should convey essential information:
  • What characters are in the frame, are they moving? Seated? Standing?
  • What are the characters saying, seeing or experiencing
  • How much time is passing, is it a long panning shot? Or a quick succession of shots?
  • Where is the camera? High, low? Over the shoulder? Birds-eye view? Is the camera moving or still?

After storyboard creation do not be afraid to change camera angles, dialogue etc... this is all part of the creative process.

Draw your storyboard in pencil so that some shots or text can be reworked. Your artwork does not need to be fancy, use basic shapes, stick figures and simple backgrounds.

Use language to describe camera angles and shot styles:
CLOSE-UP SHOT:   A close range of distance between the camera and the subject.
DISSOVLE: A transition between two shots, where one shot fades away and simultaneously another shot fades in. 
FADE: A transition from a shot to black where the image gradually becomes darker is a Fade Out; or from black where the image gradually becomes brighter is a Fade In. 
HIGH CAMERA ANGLE:  A camera angle which looks down on its subject making it look small, weak or unimportant. 
JUMP CUT: A rapid, jerky transition from one frame to the next, either disrupting the flow of time or movement within a scene or making an abrupt transition from one scene to another. 
LEVEL CAMERA ANGLE:  A camera angle which is even with the subject; it may be used as a neutral shot. 
LONG SHOT:  A long range of distance between the camera and the subject, often providing a broader range of the setting. 
LOW CAMERA ANGLE:  A camera angle which looks up at its subject; it makes the subject seem important and powerful. 
PAN:  A steady, sweeping movement from one point in a scene to another. 
POV (point of view shot): A shot which is understood to be seen from the point of view of a character within the scene. 
REACTION SHOT: A shot of someone looking off screen. 2.: A reaction shot can also be a shot of someone in a conversation where they are not given a line of dialogue but are just listening to the other person speak. 
TILT:  Using a camera on a tripod, the camera moves up or down to follow the action. 
ZOOM:  Use of the camera lens to move closely towards the subject.


Thursday, October 15, 2015

Video Production Scavenger Hunt

Hello Students,

Your next assignment will be graded on your ability to accomplish 20 specific technical shots or techniques and how creative you can be within those constraints while creating a video project. Minimum video length 2 minutes, 4-5 minutes max. We will discuss all these techniques and how to accomplish them in class. You will also be graded on time management, working in teams effectively and ability to meet the deadlines.

Teams will be chosen by picking numbers. Teamwork is crucial on this project, every one must participate and contribute to the final project. You will work in teams of 4.

Teams will shoot footage and share among each other, each team member will produce their own final edit of the project for grading.

20 Video Production Techniques
Video Project Specifications:
1 Page proposal/pitch must be approved before production can begin.

Production Schedule:
Oct 16 - Proposal Due
Oct 20 Script, Storyboard or Shot List Due
Oct 27 - Preliminary Shooting Complete
Oct 30 Rough Cut Edit Due
Nov 3rd -  Final Editing Complete and ready to present to class


Format: The final format of the video is your choice, it could be a music video, action video, narrative or experimental. You could even make an instructional video about these video production techniques. Here are some format options:

  • Produce a video about the positive people and events at our school 
  • Produce 1 or more Public Service Announcements around a current local/social/environmental issue
  • Produce a "Statement Video" on a topic that is personally important to you
  • Produce a music video
  • Produce a short narrative (drama, intrigue, wizards?)
  • Produce 1 or more comedy skits and format it as a short comedy show

Grading: For full credit your video project must contain one example of each of the 20 shots listed below. Shots may be combined, for example a twin shot that is created with a green screen. Camera work should be smooth and steady. Editing should be well timed and without edit glitches or gaps. Must have titles and tails. All deadlines listed above must be met on time.

Rules: No content that glorifies violence, drug or alcohol use. Music must have family friendly lyrical content. 

Note: Each team member must take turns shooting and acting. Outside actors or camera operators allowed. Teams may help each other for difficult shots. All project storyboard/scripts/shot lists must be approved by me before production can begin.

Each team member is responsible for editing their own final version of the video, no group efforts with editing.

A shotlist and storyboard must be created and the final video must contain 1 example each of the shots or effects listed below:


1. Silhouette Shot - actor or actors must be silhouetted against a background


2. Green Screen Shot - actor or actors shot against green screen, background must be keyed out and replaced with background still image or video


3. Single Source LighCloseup - actor or actors shot closeup with single light source for high contrast


4. Shadow Shot - camera shows shadow only, can pan up to actor after, or show interaction between two characters through shadow only


5. Twins - use static camera and split screen effect to show actor and a "double"


6. Window Illusion - overlay semi-transparent video over actor or actors to simulate window reflection


7. Frame Within A Frame - look for environments or architecture that "frames" your actor or actors


8. Background Slide - use a sideways camera movement to give the impression that the background is moving behind your actor or actors


9. Handheld Dolly Shot - follow the action with a handheld shot, must use a tripod as a counterweight to reduce camera shake, change camera height during shot


10. Fall Away - camera walks backwards from actor or actors


11. Walk In - shot begins on actor 1, in the foreground or background actor 2 steps into frame


12. Camera Flow - shot begins with Handheld Dolly Shot following actor 1 walking to the right, actor 2 passes in foreground going in opposite direction and camera changes direction to follow actor 2. This change in direction can happen 2-3 times


13. Spin Shot - camera spins around actor or actors 360 degrees


14. Motionless Camera - camera is tripod mounted, focus on motion in scene, all actor or actors must be moving. extras can help add energy to a scene


15. Whip Cut - camera quickly sweeps away from scene, edit is made to seem like camera ends on a second scene, also called a sweep cut


16. Slow Motion - Video source is slowed down by 75%. slowing down any more can be done but render time is increased. Ask me how to do extreme slow motion with Adobe After Effects.


17. Pass Through Wall - Camera moves up to wall, fades to second shot inside moving towards center of room. Can also be pass through window, pass through keyhole etc...


18. Extreme Angle - camera angle has extreme foreshortening or perspective


19. Saturated Color Background - actor or actors are shot against a background of mostly a single vivid color, such as a brightly colored wall, green grass, etc...


20. Textured Background - actor or actors shot against textured background, brick wall, fence posts, tree bark, ivy etc...

Extra information about these shots can be researched online... have fun!

- Mr. W

Friday, October 9, 2015

Introduction to Editing Video

Hello Students,

Today we will begin our introduction to video editing with Adobe Premiere. You will be editing pre-shot footage to create a fun and compelling promotional tourism spot for the city of San Francisco.

Imagine yourself in the Directors Seat... it's time to make your vision happen!

Part 1 - Learning Adobe Premiere:
  • Launch Adobe Premiere
  • Watch videos 1 through 13 in the "Learning Premiere Pro" section of the Adobe TV website
  • Practice the steps that you can as you watch the videos
  • Find a sample video file to practice editing, color correction, outputting, etc...
  • If you can watch all 13 videos you are on your way to being a video editing pro! When complete watch the other videos in that section to learn how to process and distribute your movie files


Part 2 - Editing a Promotional Tourism Video for the City of San Francisco

Project Concept: The City of San Francisco has hired you to edit a promotional tourism video. They have provided you pre-shot footage and your job is to make it sing! Your commercial will play on local television stations coast to coast, so it should have universal appeal. Your commercial should promote the unique sights that the city has to offer.
  • Your final video file should be exactly 30 seconds long
  • Use music that fits the energy of your video
  • Edit your video cuts to be timed with the music
  • There should be an edit in the video footage every 2 to 5 seconds
  • Make sure your sequence settings in Premiere match the specifications of your source video
  • Use color correction to enhance the footage
  • Use video transitions to keep the video compelling and interesting, but be careful not to overuse them or repeat them too many times
  • Create text titles to create a "call to action" at the end of your video, something like "Visit beautiful San Francisco today!"
  • Add 3 seconds of blank video to the beginning and end of the video before exporting with your in and out markers
  • Have fun!

- Mr.Wilson

Monday, October 5, 2015

Experiment With Maya Physics

Hello Students, 
Your next project is an exploration of Maya Physics. Maya uses a soft/rigid body system and different fields that can modify the interactions of these simulated objects, these fields are things like gravity and wind.... 

Maya Physics Experiment:
Your assignment is to follow the simple tutorial below, then create a fun physics experiment and then render it. Don't get too elaborate or your computer will take weeks to complete the calculations in your simulation. Use all the skills you have developed up to now to set up your 3D file with a proper project folder, render settings, materials, image based lighting etc....

Part 1: Basic Physics Simulation

  1. Launch maya and make a new file
  2. Give your timeline at least 500 frames and zoom out the timeline so all frames are visible in the timeline
  3. Create a cube and shape it into a flat  surface like a table
  4. Create another cube, along with a sphere and a third shape of your choice
  5. Arrange the new shapes in a column that is positioned over your first flat table shape that you made
  6. Select the table shape and press down on the spacebar to bring up your marking menu, select "Soft/Rigid Bodies" and choose "Create Passive Rigid Body"
  7. Now Select the column of objects, the cube, sphere and third object of your choice and then press the spacebar to bring up your marking menu again and choose "Soft/Rigid Bodies" and select "Create Active Rigid Body"
  8. With your 3 objects still selected go back to your marking menu... this time select "Fields" and choose "Gravity"
  9. Press the play button to see your objects fall from the gravity and bounce on the tabletop
  10. Congratulations! You just made a physics simulation in 3D!


Part 2: Make Something Awesome
With a little ingenuity and some basic knowledge you can make a really cool simulation, try using more shapes or different types of platforms and passive solid bodies for interesting results. You can give passive objects a pivot point so they spin when hit. You can add a few keyframes to an active rigid body to launch it in a certain direction.  Here are some ideas you can do with just basic knowledge:
  • Make a wheel or sphere roll down a ramp and into a jump
  • Make a wheel or sphere roll on a track
  • Make an obstacle course for a sphere to roll down
  • Make bowling pins and knock them down with a sphere
  • Make a brick wall and knock it over
  • Make a tower of bricks and blow it over with a wind field

Part 3: Render Your Simulation
  • Once your simulation is perfect make some materials for your objects, make some shiny, some glassy and some have a matte surface
  • Set up a project folder for this simulation file, make sure you create the file directory first then "set" the project to that new directory
  • Turn on Mental Ray and load up your best settings, use an image based lighting setup to add some good realism to your scene
  • Render your scene and turn it in as a video file to mad max when it is ready


Monday, September 28, 2015

Create a Cornell Box

For this project you will be getting more familiar with the workflow and methods in using Autdodesk's Maya to create a 3D scene with objects, lighting, a camera and textures. You will then render this scene and adjust quality, then render an animation to learn the basics of keyframing and render settings as well.


Cornell Box Project: Lights, Camera, Action!

History of the Cornell Box: The Cornell Program of Computer Graphics has become best known for its research on physically based rendering. They believe that computer graphic simulations will never become predictive of reality unless we correctly model the physics of light reflection and energy propagation within physical environments. The Cornell Box experiments have come to symbolize our approach to physically based rendering, it is a simply physical environment for which they have measured lighting, geometry and material reflectance properties. Digital, or synthetic images of this environment are created and compared to confirm accuracy of our simulations with 3D software.

A photograph of the original physical Cornell Box.
For this project you will create a scene to simulate the Cornell Box. You will create an environment, objects, textures, a light source and explore the rendering software available in Maya to try and recreate the photo we see above.

A Cornell Box created by Seth Wilson using Maya. This scene contains the famous Utah Teapot. Textures are made with blinn, lambert, phong, the light is a point light using depth map shadows, the scene was rendered with Mental Ray
Cornell Box Project Part 1: Creating The Scene
  1. Open Maya and create a new scene
  2. Create a cube that is perfectly square, turn on Component Selection and delete the front face of the cube so you have a box
  3. Create 2 more cubes and scale/stretch and move them into position to act as your pedestals in the scene
  4. Create a cylinder, sphere, triange or cone and other primitive objects and arrange them in your scene as above using the move and scale tools
  5. Create a cube and flatten it with the scale tool, position it on the roof of your box to act as a "light" later on
  6. Open your Hypershade window (Window Menu/Rendering Editors/Hypershade) and create 2 materials using the Lambert material, make one have a red color and one green. Double click the material to see the material settings
  7. Select your box and turn on Component Selection, select the right face inside the box and apply your red Lamber material, then select the other side and apply the green Lambert material. Select the face first, then right-click on your Material and choose "Assign Material to Selection" to apply it to that face
  8. Create a point light and move it to the top of the inside of your box using the move tool. Turn on "Use All Lights" in your view options to see it affect your scene
  9. Render your scene and check the quality, if your light is illuminating the scene your are doing great!
  10. Close your Render Window
  11. Open your Hypershade window again and create different materials for each of the objects in your scene, try a blinn, a lambert, a phong and try creating a 2D texture such as a checkerboard patter
  12. Select an object first, then right-click on your Material and choose "Assign Material to Selection" to apply it to that object
  13. To make your roof light cube glow, create a blinn material and set it to have a white color, set the illumination to half way to make the object bright, scroll down to the Special Effects section of the blinn material and set the Glow Intensity to 0.010 and apply the blinn to your roof light cube
  14. Under the Create menu, create a Camera
  15. Change your view point to see through your camera, it will be called Camera1 and it is under the Perspective submenu in the Panel menu of your view window
  16. Center your camera to view your scene straight on
  17. Click the render button to see what you get! Compare with your classmates results


Cornell Box Project Part 2: Render Settings

  1. Your scene may not look like mine yet, that is because we must change some render settings for best results. Go to the Window Menu and under Rendering Editors choose Render Settings and you will see the Render Setting Dialog Box
  2. Under the "Common" tab scroll down to Image Size and set it to 1K square, this will make your render square, notice there are other settings for different resolutions, such as common HD video and film dimensions
  3. On the top of the dialog box, there is a pull-down menu next to the text "Render Using", change the pull down menu to Mental Ray, now there are new tabs available to peruse
  4. Under the Quality Tab choose Final Gather, open up the Raytracing section and set reflections and refractions to 10, Max Trace Depth to 20, Shadows to 2 and Blur Limits to 1
  5. Under Features make sure that Global Illumination, Raytracing, Final Gathering, Shadows are all checked on, along with the other defaults
  6. Under the Indirect Lighting tab make sure Global Illumination is checked on, set Accuracy to 500
  7. Under the Indirect Lighting tab make sure Final Gathering is Check on, Accuracy set to 1024, Point Density to 1.00
  8. Under the Indirect Lighting tab, open Final Gathering Map, set Rebuild to On
  9. Its a good idea to save these render settings as a Preset so you can call them up again later for other projects
  10. Now close the Render Settings, save your file
  11. Click the Render button and see what kind of results you get, there should be a serious improvement over the previous render
  12. Save your render as an image from the Render window to look at later so you can lean back and admire your hard work!


Cornell Box Project Part 3: Animate Your Camera

  1. Spend some time fine tuning your render and scene to make sure it looks it's best, adjust lights, textures and positioning before proceeding
  2. Bring up your camera view and center it on your box with the camera move tools
  3. In your time line enter 60 frames into the duration field and drag your time slider out so all frames are visible in your timeline
  4. On frame 1, with your camera selected (you can select it by clicking on it in the outliner or another view window) press the "S" key to create a keyframe. A red line will appear on your timeline to show that a keyframe has been created
  5. Slide your time line down to frame 60 and then use the camera move tools to zoom your camera into your scene, add a slight pan to your camera move as well to add a little dimension.
  6. With the camera still selected press the "S" key to make a second keyframe on your timeline
  7. Press the play button to preview your camera move and adjust if needed, you should have a nice slow movement like the one above
Cornell Box Project Part 4: Set Up Your Project Folder

  1. Rendering an animation requires setting up a project folder which contains your maya file and a set of folders for containing all the required materials, files and assets in a maya project. Your project may not utilize these resources but maya needs this file/folder structure anyway and it is not possible to render animated frames without them
  2. Close Maya and make a new project folder on your computer, place your cornell box maya file inside it and open the file by double-clicking on it.
  3. After your file is open go to the File Menu / Projects / New and your will see the project set up dialog box
  4. In the Name Field type in a name for your project, this should be something like CornellBox_Project
  5. Verify that the location is correct, click browse and navigate to your project folder if needed
  6. On the bottom of the dialog box, click Use Defaults and you will see the folders names being created
  7. Click Accept to complete
Cornell Box Project Part 5: Render Your Animation

  1. With your maya file still open, go to the Window Menu / Rendering Editors / Render Settings
  2. In the Common Tab set up your options for your animation. under File Output set the Frame/Animation ext to name#.ext
  3. Set Image Format to Maya IFF
  4. Scroll down to Frame Range and enter your start and end frames, start should be set to 1 and end should be set to 60
  5. Scroll down and set Renderable Camera to Camera1, your animated camera
  6. Choose your image size from the preset pull down menu, I used a 1K Square image for my own example above
  7. Close the Render Settings window
  8. Press and hold the Space Bar to bring up the Maya Marker Menu, click on the Render Menu and choose Batch Render, Maya will now begin to render your animation, this may take awhile depending on how long it takes to render each frame
  9. When the render is done maya will give a message that says Render Completed in the Mel Script window
  10. When your render is done open your project folder and look in the images folder to see your frames
  11. Open the Fcheck program (located in the autodesk/maya folder in your applications folder) and load the IFF file sequence you just created to check for quality
  12. You may use Fcheck to export a quicktime file, or you can use a program like After Effects to create a video file from your animated sequence
  13. Turn in a quicktime file of your animation and pat yourself on the back! Woo!

Wednesday, September 23, 2015

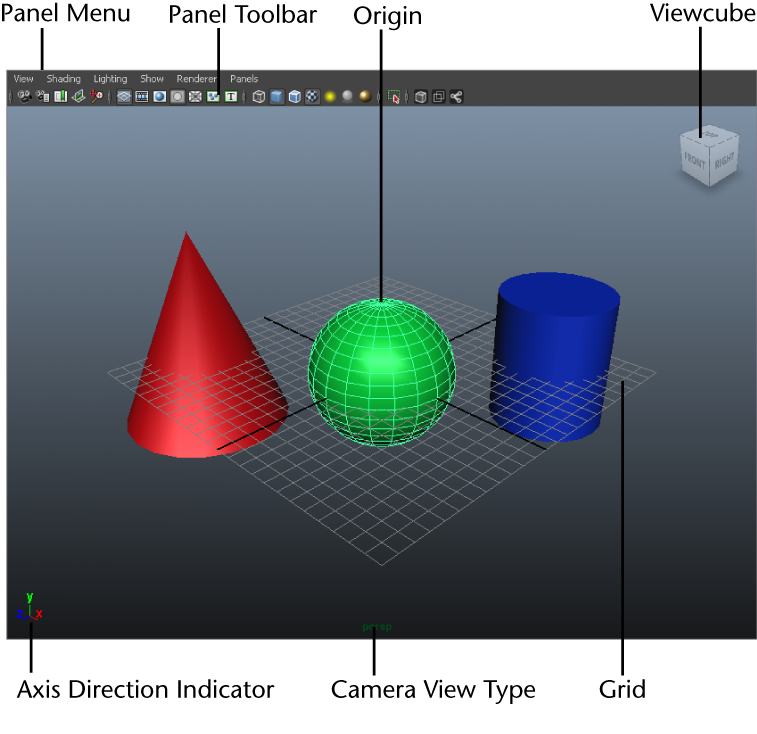
Getting Oriented to the 3D World of Maya

Hello Students,
Today we begin a new project in using a 3D program to create computer generated imagery. We will be using Autodesk's Maya, a cutting edge program widely used in the entertainment industry. We will begin with the basics and move on to more complex projects such as creating 3D models, and adding lights, textures and cameras and animating them and move on to more complex tasks such as merging video and 3D together with motion tracking.

Maya Basics:
Find and launch Maya on your computer, then open each of the links below if safari. Read through each page of the 3 lessons below and try out the steps for your self in Maya. These lessons will teach you how to use the Maya interface, how to create and manipulate objects and how to control your objects and your view of your objects. Create something with the skills you develop here and save the file as "mayabasics_yourname.ma" and copy it to the external drive to turn it in.

Link: Getting Started with Maya

Link: Creating and Manipulating Objects


Link: Viewing and Controlling your 3D Scene


Friday, September 11, 2015

Visual FX Project: Lightsaber Duel

Hello Students,
To develop our motion graphics and visual effects skills we will work in teams to shoot a short video and use After Effects to apply a lightsaber effect. There a several ways to achieve this effect and I will demonstrate them both to the class. There are tutorials listed below to illustrate effective technique. This project will utilize masks, keyframing and effects to achieve the final result.


Lightsaber Duel VFX Project:

  • Work in teams of 3
  • Shoot a short lightsaber battle sequence that consists of at least 3 different shots, don't make too many shots where the lightsabers appear or you will create too much work for yourself
  • Create a short storyboard that shows each shot and include dialog, camera angle and camera action (camera pans left, camera tracks right, etc)
  • After shooting, copy the video footage onto each team members computer, each team member must produce their own final video with their own VFX, SFX and final edit.
  • There are 2 methods for creating the saber effect, using the Beam effect or using solids with animated masks and glow effects added, this is the preferred method and will achieve the best results
  • Add sparks, lightning or lens flares to enhance the effect
  • When complete, export your final movie and copy to external HD for credit
Resource Links:
Tutorial: Using masks and glow to create lightsaber VFX

Grading Rubric:
2 Points for storyboarding and smooth camera work
2 Points for effective use of VFX methods
2 Points for clean editing, no glitches, added sound effects
2 Points for turning in on time
2 Points for good team work and participation by all team members


Due on tuesday, have fun!
 - Mr.W